Earth battery: Difference between revisions
No edit summary |
No edit summary |
||
| Line 57: | Line 57: | ||
<span class="page-break"> </span> | <span class="page-break"> </span> | ||
*Put the cathode in the container (make sure that the glue dried and the coal is stuck to it). | |||
*Fill the jar with mud so it covers the cathode, keeping the wire out of the container. | |||
*Mark the wire with tape to identify that its negative. (black = negative) | |||
*Hit the container to get all the trapped air bubbles out. It is VERY IMPORTANT to release the air bubbles from the mud. | |||
==== Making the proton exchange membrane ==== | ==== Making the proton exchange membrane ==== | ||
Revision as of 09:12, 13 July 2023
... looking back:
✧˖°. Mud batteries ⋆ ˚。⋆୨୧˚
How-to make batteries from soil
The 8th edition of the H&D Summer Academy "Connecting Otherwise" was organized in a distributed manner. H&D invited four initiatives (DDDUG, Hackitects, MELT, NEWS) to develop a workshop program together on four different interconnected locations: Amsterdam, Aotearoa (formerly known as New Zealand), Berlin (+ online) and Seoul. In Amsterdam we were accompanied by the Hackitect collective (Michel Barchini, Mary Farwy). In the workshop we invited participants to imagine and try out ways to radically reduce the energy use associated with communication technologies such as the Internet and consider a low-tech approaches to 'connecting otherwise'. The workshop incorporated different experimental approaches simultaneously. One focused on exploring strategies from DIY biotechnology where bacteria found in local iron-rich soil are harnessed to generate and store energy.
Collecting mud for the battery
Look for reddish brown soil (rich in iron) near river beds and swamps, areas where water has a reddish color. Preferably collect deep samples not from the surface.
About 1 liter makes 2 batteries. Ideally you get it a few days before the workshop, but it should be fine for up to two weeks. It is always good to collect more mud than what you calculate, in case some spill during preparations.
Make sure you take mud as well as some water (see image below).
Tools & Materials
- Pot and stove to cook the agar mixture
- Multimeter
- Clippers and wire stripper
- Breadboard
- Kitchen scale
- Liquids measuring cup
- Tape (or anything to mark different wires)
Materials
- Mud
- Containers with wide opening on top (ex: glass jar or plastic container - around 1L)
- Electric wires (Copper wires 30 cm - 2 wires are needed per battery)
- Stainless steel grids to be cut in rectangles. Size : around 8 x 8 cm, but can change according to the size and shape of your container. Aluminium nets are good to use but they are less conductive. You can use also kitchen strainer mesh. You can also experiment with the size of the net, for example: making it like a strip 8 x 20, to have more surface area. In this case you can roll it without making the surfaces touch.
- Epoxy glue
- Small brush to spread the glue
- Active coal
- Agar (10g is needed per 1L battery)
- Salt substances (any broth powder - 1 pack, 2g per battery). Broth powder is the one you use for cooking. We used the veggie broth cubes that you buy from the supermarket.
- LED
- Drinking Water
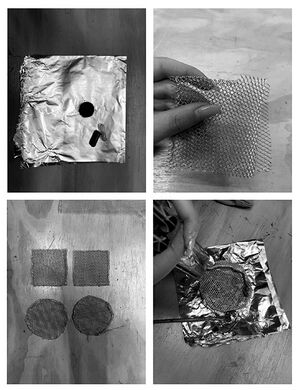
Making the Cathodes
To make the cathodes you need the active coal, epoxy glue, metal nets and electric wires.
ID: Hands performing the steps described in what follows
- Empty the pills of the active coal to get the powder out, and place it on a sheet. (about 10 pills powder per 1 cathode disc)
- Cut two meshes in a rectangular shape 8 x 8cm. Place them in opposite directions and fold the edges so they are attached. We make two layers so it can hold the glue and coal well.
- Brush the glue on the mesh and make sure that you add enough glue and that it is brushed evenly on the surface of the mesh.
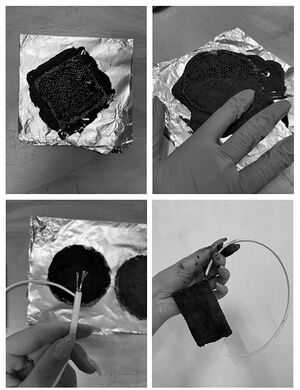
ID: Hands performing the steps described in what follows
- Cover the brushed mesh with the active coal powder and press it very well. After pressing, add coal and press again. It is very important that the coal is covering the whole surface.
- After making sure that the mesh is covered and pressed with coal, connect the mesh from one of the sides to an electric wire. At the end you might need to bend the mesh to fit your container. Bend it, but be sure not to make the edges touch each other. More coal surface is better! Now leave it to fully dry.
Preparing first part of the Soil Battery
For this step you need the container (glass jar), mud, the dried cathodes.
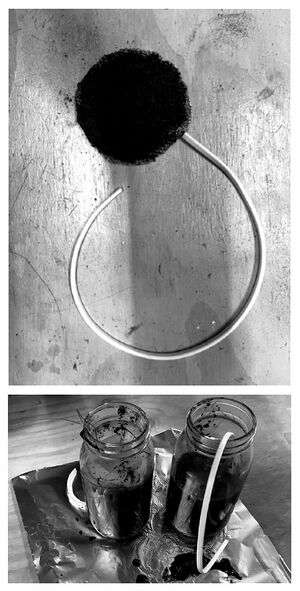
ID: 1. The finished cathode, 2. Two glass jars half filled with mud, with a wire from the cathode coming out of the opening
- Put the cathode in the container (make sure that the glue dried and the coal is stuck to it).
- Fill the jar with mud so it covers the cathode, keeping the wire out of the container.
- Mark the wire with tape to identify that its negative. (black = negative)
- Hit the container to get all the trapped air bubbles out. It is VERY IMPORTANT to release the air bubbles from the mud.
Making the proton exchange membrane
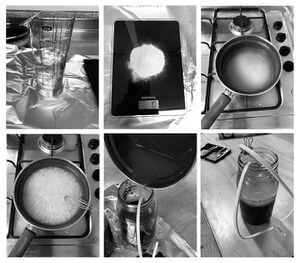
ID: Process of preparing and pouring the agar described in the steps below
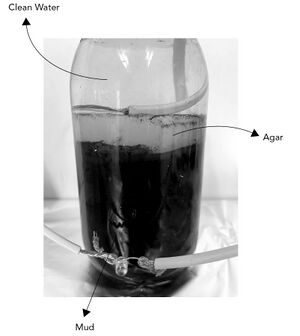
ID: Mud battery in a glass jar: half filled with mud, then a layer of solidified agar, and filled to the top with clean tap water. Two cables are coming from the jar and are connected to an LED for illustration purposes.
Connecting the batteries in parallel
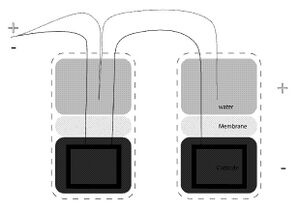
The water part in the battery is (+) and the mud part is (-). When connecting two batteries in parallel the (-) from the first battery should be connected to the (-) in the second one, and the (+) from the first to the (+) in the second. Then the (-) and (+) should be connected together to close the circuit. See the drawing:
ID: Diagram of two mud batteries connected in parallel: The cathode (or minus, black) comes from the mud of battery one and is connected to the cathode of battery 2. The anode (or plus, red) is the wire sitting in the top half in the water, and is connected to the anode of battery two.
The mud-batteries how-to was assembled in preparation to the H&D Summer Academy 2022 "Connecting Otherwise," and used as a guide during the workshop "SoilPunk" by Hackitects in collaboration with H&D. Visit https://github.com/hackersanddesigners/Soilpunk_joulethief for more complete documentation. Listen to the audio documentation of Radio Echo Collective: https://www.mixcloud.com/RadioEchoCollective/hd-connecting-otherwise-soilpunk-with-hackitects-x-hd/
